Recently I’ve decided that having limited high quality entertainment choices is better than having endless choices that are of questionable quality. So my household decided to end our Netflix subscription. This decision motivated me to build a private streaming media server for our home. Here is how I created a home media server with Plex and a home server tower.
Choosing the Media Server
There are two popular software options for home media server. Plex and Kodi. They are both free to use, though Plex does have a premium subscription option to unlock advanced features. These two media servers are very similar, and I believe they’ve been forked from the same original open source project.
I knew my household would be using our PS4 as a client of the media server. This ended up being the detail that helped me make the decision between the two. When I saw that Kodi recommended using the Plex app for streaming on the PS4, I decided to use Plex directly.
Choosing the Hardware
This Plex media server will need some hardware to run on. In my case, this meant I’d need to acquire new computers because everything I have are either not suited to the job (e.g. laptops), are already dedicated to something else (e.g. Raspberry Pi, PS4), or don’t exist (i.e. I don’t have any other computers).
So, I needed to get a server, of some type, to run Plex on. I didn’t want to spend the time building a server myself. Rather than dealing with potential hardware hiccups, I wanted to focus on the software and networking parts of this project. So I considered these three options:
- Raspberry Pi
- NAS
- Some kind of home server or PC
The Raspberry Pi was initially the more attractive option. But, I doubt that the little ARM processor will be able to keep up. I could see it getting really bogged down if there’s more than one stream, or if any transcoding is needed.
Next to check out was a NAS. These seemed ideal at first. But their shine dimmed as I dug into prices and specifications. Price was the key factor. I could easily spend around four hundred dollars on an entry level NAS that had no hard disks.
A quick web search for “Home Server” brought me to the Dell PowerEdge T30 on sale at Amazon for $376.20. This seemed like a good option. It came with a Intel Xeon E3-1225 v5 3.3GHz processor, 8GB of RAM, and a 1TB HD. This looked like a great value.
To make sure the T30 would work, I started investigating CPU requirements in more depth. I wanted my server to handle transcoding two 1080p video files simultaneously. Plex recommended that transcoding one 1080p (10Mbps, H.264) file would need a CPU with a 2000 PassMark score. So, getting a CPU with a 4000 score should theoretically be able to double that number to two. The Xeon E3-1225 v3 has a score of 7,830. That meets my requirements and has plenty of cushion.
The T30 had the processing power, had the 1TB disk, was budget friendly, and already built. It didn’t need anything more. I just had to un-box it, plug in power and some initial peripherals (to handle OS installation) and connect it to my network via Ethernet.
Choosing the Operating System
I didn’t have any desire to mess with Windows for this project. I’ve been using Linux for most of my recent projects and I’d like to continue that trend. There’s also nothing about Plex that requires Windows software.
I settled on using Ubuntu Server. It’s a widely used distribution of Linux that has a lot of documentation available.
Install Ubuntu Server
Download the ISO from their website.
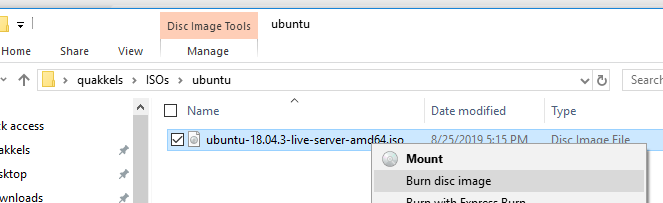
Once it has finished downloading, make a boot disk with it. This is very simple with Windows 10.
- Place a write-able disk in your disk drive.
- Right click on the Ubuntu ISO file and select “Burn disk image.”
Get the boot disk in to the DVD drive of your server. Then with the disk in the drive, turn on the server.
As the server boots, smash that F12 key to enter BIOS to Boot from the DVD drive.
Another option is to create a bootable thumb drive using a tool like Balena Etcher to image the drive. I used writeable DVDs because I have so many left over from the 2000s that I just might as well use them up.
Ubuntu’s documentation is very good. Follow these directions for installing Ubuntu Server. They have screenshots and instructions of their installation screens, so I’m not going to go into too many details here.
When asked, be sure to install SSH for remote access. This allows you to manage the server from your regular workstation. So you can put your server out of the way. And, you don’t have to worry about connecting monitors or keyboards to work on it. Finish off the installation by restarting the box.
Once you’ve finished installing Ubuntu Server it should:
- Be connected to the network via Ethernet
- Have a Name (mine is named
media) - Have a User on the server (my user is
quakkels) - Have SSH installed
So, now look in your router’s connected devices to find your server’s IP address on your network.
Log in to your server from your main workstation via SSH:
$ ssh 192.168.1.11 -l quakkels
Use your server’s local network IP address and your user’s username in the command above.
The next thing we need to do is install Samba on the server.
Install Samba
I want to be able to access the media folder that’s on my server from my laptop. I need Samba installed in Ubuntu to do that.
$ sudo apt-get install samba
Then add a user to Samba. I’ll use the quakkels user.
$ sudo smbpasswd -a quakkels
Then, create a folder to share.
$ cd ~
$ mkdir library
Now, edit the configuration file with your preferred editor. I’m using Nano.
sudo nano /etc/samba/smb.conf
Scroll down to the end of the file and add these lines.
[library]
   path = /home/quakkels/library
   available = yes
   valid users = quakkels
   read only = no
   browsable = yes
   public = yes
   writeable = yes
Replace library with the name of your own shared folder and quakkels with your own user.
Save the file and exit the editor.
Restart the smb daemon to apply the configuration changes.
sudo service smbd restart
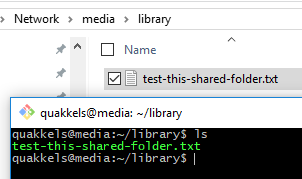
So at this point the share should be working and accessible on your network. Use Windows File Explorer to test it.
I navigated to \media\library and logged in with the Samba user quakkels and placed a file. Test succeeded!
Install the Plex Media Server
Unfortunately, Plex is not available via apt-get in Ubuntu. But the Plex website does lay out a process for installing the server on Linux.
Start by downloading the .deb file for Plex. I found the .deb file available here: https://downloads.plex.tv/plex-media-server-new/1.16.5.1554-1e5ff713d/debian/plexmediaserver_1.16.5.1554-1e5ff713d_amd64.deb and I’ll be using that URL with wget in Ubuntu to download it directly to the server.
$ cd ~
$ wget https://downloads.plex.tv/plex-media-server-new/1.16.5.1554-1e5ff713d/debian/plexmediaserver_1.16.5.1554-1e5ff713d_amd64.deb
Then, once the .deb packaged has finished downloading, we can install it with dpkg.
$ sudo dpkg -i plexmediaserver_1.16.5.1554-1e5ff713d_amd64.deb
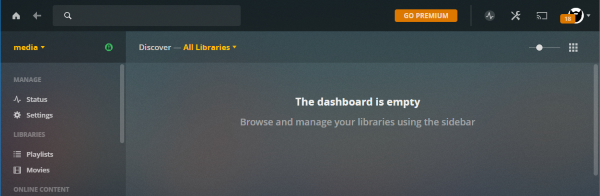
Now you can navigate to the Plex web site from a computer on your network by going to http://{your-servers-ip}:32400/web/.
Plex is now running. You can follow Plex documentation to add Plex repositories for future updates, and for adding your media to Plex libraries.
Further Reading
- 3 Ways to Install Deb Files on Ubuntu Linux
- How to Install and Configure Plex on Ubuntu Linux
- How to Share Files Between Windows and Linux
- Plex Media Server Downloads
Please share this post with a friend, and subscribe to get notified of new posts.
Comments may be sent to blog@quakkels.com.