
There’s no doubt about it, C# is my favorite language. It breaks my heart whenever anyone points out that it’s basically just Java. (Looking at you, Robert C. Martin.) Though it may be inspired and even derived from Java, I much prefer the C# and .NET ecosystem. I’m sure familiarity plays a large part in my preference for it, as well as some old-fashioned nostalgia, and perhaps even a simple convenience factor. Even so, C# is a powerful tool that shouldn’t be dismissed lightly. The power doesn’t just come from the language. It also comes from the frameworks, libraries, and documentation.
I also like running open source software. My preference for open source software has led me to use Linux on all my personal computers. Windows is a powerful tool that shouldn’t be dismissed lightly. But, I’ve decided that running a transparent operating system like Linux is more important to me than Windows features. For most of C#’s existence, it only ran on Windows systems. Given the comparisons between C# and Java, Java was clearly beating C# in cross platform compatibility. Mono blazed a trail for C# development on non Windows platforms, but there were a fair number of compatibility issues. That is, until Microsoft announced in 2014 that ASP.NET “vNext” would be Mono compatible, and it would be open source.
Now we’re several years removed from that announcement, and there have been a ton of growing pains. But ASP.NET Core is open source, it’s cross platform, and it’s proven to be a workhorse. It’s the first tool I want to grab when starting a new project.
So that’s why I’m writing this blog post. If you’re a bit of an idealist, like I am, and you want to run open source software while still leveraging the powerful C# development ecosystem, then this should give a quick glimpse into what it’s like to develop C# websites on Linux.
I’ll cover three things:
- Creating Solutions with Projects
- Debugging and Intellisense via Omnisharp in VS Code
- Adding project references
Install the Tools
First, you need a copy of Linux to work in. I’ve chosen Linux Mint, and I encourage you to use that, but you can also use just about any other Linux distribution, but you’ll have an easier time following along if it’s at least based on Debian like Linux Mint and Ubuntu.
Once you have a copy of Linux running, install the dotnet SDK and runtime. Microsoft doesn’t have installation instructions specific to Linux Mint, but since it’s based on Debian I used the instructions on their “Install the .NET SDK or the .NET Runtime on Debian” page. Install both on your computer. If you’re not running Linux Mint, look for the distribution you’re running in their list of supported Linux distros.
Next, install Visual Studio Code. If you want you can use JetBrains Rider, which is a full fledged IDE that runs on Linux, Mac, and Windows. It’s a proprietary product, but it’s a high quality option if you’d like a more streamlined development experience. I’ll be using VS Code in this walkthrough.
Create The .NET 5 Solution with Projects
Using the dotnet CLI we’ll create a multiple project Solution. It is common for multiple .NET Projects can be associated in a single Solution file. This allows a formal organization for multiple related projects. With a Solution (SLN file) we can designate that a web project and a business domain project are related and meant to exist together. And when they’re defined that way, they can be managed together as a single unit instead of as completely separate projects. (For this example, we’ll forgo creating a unit testing project. But remember, if this were a real project then you should unit test the code that needs to work.)
In a terminal, navigate to a directory where the new .NET Solution will be created. I used my user’s home folder (/home/quakkels/.)
Create a new directory for the Solution, and change directories into it.
mkdir DotnetSolution
cd DotnetSolution
Now we can use the dotnet CLI command to start. We can first list out all the templates that dotnet can create for us from new.
dotnet new --list
In the results of the --list flag we can validate that there’s an option to create a Solution File (SLN for short.)
Create a Solution file. For consistency, I recommend naming it to match the solution folder.
dotnet new sln --name DotnetSolution
Then if you’re curious, take a peek at the contents of the new SLN file.
cat DotnetSolution.sln
So far it’s just full of a bunch of generic boilerplate. But that will change as we add Dotnet projects to it.
Create a dotnet web project.
dotnet new web --name DotnetSolution.Web
If you list the current directories contents with ls, you should see the SLN file and the new DotnetSolution.Web folder.
Now add a class library project to handle all the behaviors that aren’t specific to the web.
dotnet new classlib --name DotnetSolution.Behaviors
Now that we have these projects, we need to add them to the SLN file. The dotnet CLI makes a sln command available so we don’t have to manage the contents of that file by hand.
Add both projects to the Solution.
dotnet sln add ./DotnetSolution.Web/DotnetSolution.Web.csproj
dotnet sln add ./DotnetSolution.Behaviors/DotnetSolution.Behaviors.csproj
We can verify the Solution has the projects by running:
dotnet sln list
The benefit of having these projects in a Solution is that we can execute commands on the Solution which will affect both projects as a unit. That’s better than needing to run the same commands multiple times, once for each project. Some commands available are dotnet clean, dotnet restore, dotnet build, and if we had a unit test project we could run dotnet test.
To make sure the web project is working, use dotnet to run the web project.
dotnet run --project ./DotnetSolution.Web/
You will be able to navigate to the website using https://localhost:5001. But, your browser will tell you the SSL certificate can’t be trusted. Microsoft and aspdotnet core 5 automatically configure new websites to use HTTPS, even for local development. So you can either just tell your browser to proceed to the website, since you know it’s safe. Or, you can go through the steps to trust the dev certificate. The unfortunate truth of it is: this is a bad dev experience on Linux. There is a command to create dev certs: dotnet dev-certs https -v. And, there’s a command to trust the dev cert: dotnet dev-certs https --trust, but it’s only supported on Mac and Windows. If you run it in Linux, you’re given a URL to follow to manually trust development certificates. The simplest way to proceed, for now, is to add a certificate exception to your browser.
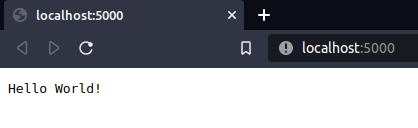
After navigating to https://localhost:5001, verify that you see “Hello World!”. Then shut down the server by cancelling the process with Ctrl + C in the terminal.
Use the Debugger and Intellisense in VS Code
Next, we need to set up debugging in Visual Studio Code. Open the DotnetSolution directory in VS Code. It’s very quick to use the following command in the terminal that’s in the DotnetSolution folder.
code .
VS Code will probably ask you to install recommended extensions for C#. Go ahead and install extensions. If it doesn’t ask, then go to the Extensions tab and install the C# extension by Microsoft. After the extension is installed, I recommend closing VS Code and starting it up again using the same code . command in the DotnetSolution folder.
After opening the DotnetSolution folder in VS Code, you should see a popup asking you to add assets for running and debugging.
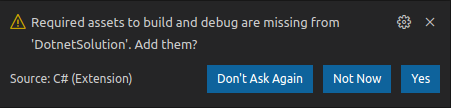
Click “Yes.”
After clicking “Yes” you will see another popup dialog asking you to select the project to launch.

From the list, select the DotnetSolution.Web project.
Using the left navigation go into the Debug tab, and click the “play” button to launch the .NET Core Launch (Web) configuration.

Now, when the site is launched with the play button, it will build and open in your browser.
Then, to check that debugging is working, stop the site using the stop button at the top of VS Code then add a breakpoint in Startup.cs.
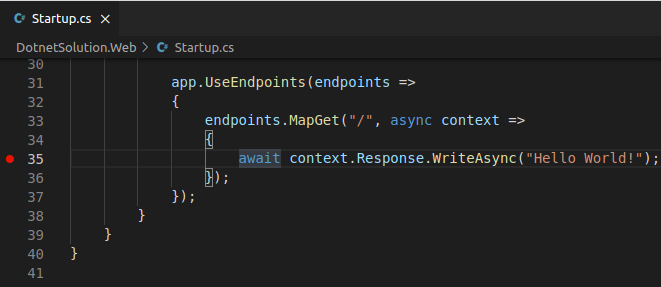
And launch again with the play button under the Debug tab.
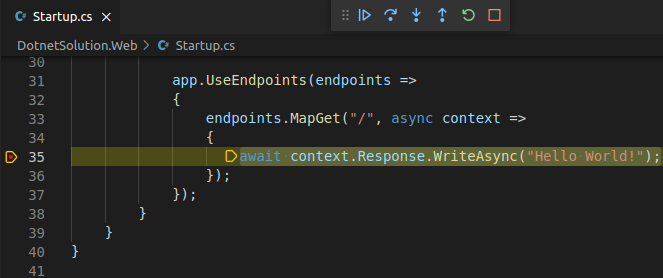
Now we have debugging working in our Dotnet Core 5 website on Linux.
Add a Project Reference
So far, we’ve just installed tools, created a solution with those tools, and configured the development environment. Now, let’s do some actual programming in the DotnetSolution.Behaviors and then let’s add a project reference so we can use DotnetSolution.Behaviors in the website.
The website currently just prints “Hello World!” and that’s it. Instead of a generic message like that, I want it to tell me a random joke. The joke delivery mechanism isn’t specific to the website. It just delivers a joke. It could be delivering a joke to a console app, to a database, or any other type of application. So, the fact that the joke will be displayed in a website is an implementation detail. We’ll keep the implementation details separate by putting the joke behaviors in the DotnetSolution.Behaviors class library.
Using VS Code, in the DotnetSolution.Behaviors project, rename Class1.cs to JokeRepository.cs and put the following code in it:
using System;
namespace DotnetSolution.Behaviors
{
public static class JokeRepository
{
private static string[] Jokes = new string [] {
"I’m reading a book about anti-gravity. It’s impossible to put down.",
"6:30 is the best time on a clock, hands down.",
"I can tell when people are being judgmental just by looking at them.",
"I was wondering why the frisbee kept getting bigger and bigger, but then it hit me."
};
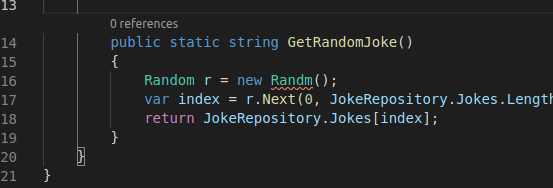
public static string GetRandomJoke()
{
Random r = new Random();
var index = r.Next(0, JokeRepository.Jokes.Length);
return JokeRepository.Jokes[index];
}
}
}
As you’re working in the JokeRepository.cs class, you should notice that there’s syntax highlighting and some Intellisense style features popping up.
If you don’t see syntax and error highlighting, then you may need to restart VS Code, since the Omnisharp server in the C# extension may have shut down for some reason.
Now, open up Startup.cs in the DotnetSolution.Web project so we can display jokes instead of the “Hello World!” message.
Find this line:
await context.Response.WriteAsync("Hello World!");
And replace it with this:
await context.Response.WriteAsync(JokeRepository.GetRandomJoke());
Now, if the C# extension is working correctly, you should see error highlighting on that line, and if you hover your mouse over it, you’ll see this message:
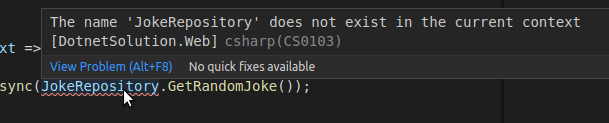
Even though DotnetSolution.Behaviors is in the same Solution as DotnetSolution.Web, the web project doesn’t have a reference to the behaviors project yet.
So, making sure you’re terminal is working in the DotnetSolution folder, run this command to add a project reference.
dotnet add DotnetSolution.Web/ reference DotnetSolution.Behaviors/
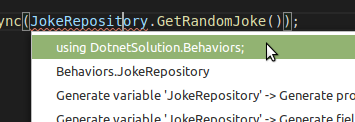
Now if you place your cursor on the error highlighted JokeRespository in code, and press ctrl+. then you’ll be given the option to add a using statement for DotnetSolution.Behaviors. Go ahead and add it to the file, and the errors will go away.
Once the errors are gone, run the site again. You can either launch it with VS Code, or with the dotnet run --project ./DotnetSolution.Web/

And there’s the random joke.
Conclusion
There we have it. An ASP.NET Core website developed on Linux. Granted, this is a super simple site. But I hope I was able to show you enough about the C# development experience on Linux to get you to consider trying it for your next project.
Please share this post with a friend, and subscribe to get notified of new posts.
Comments may be sent to blog@quakkels.com.